Switching between zsh Themes with a Shell Command
July 3rd, 2022
(4-minute read)
Introduction
When you're recording a screencast for your latest piece of educational content, it's a good idea to simplify your dev setup. Removing distracting tooling customizations reduces cognitive load, so that learners can focus on the key ideas you want them to understand.
But as a developer, you probably also have your own preferences for tooling when you're working on your own programming projects outside of teaching.
There's a great post by Joe Previte on How to Create Code Profiles in VSCode, which shows you how to create a shell command that switches between two different sets of VS Code settings.
In this post, we'll expand that shell command to also switch between command prompt themes, to keep your terminal simple and distraction-free.
Prerequisites
This post assumes that:
- You're using zsh.
- Not sure which shell you're using? On a Mac, open the Terminal app, and run
echo $SHELL. It should output/bin/zsh. - Note: If you're using bash, you can still use the same principles from this post. But anywhere it says
zshrc, you'll usebashrcinstead.
- Not sure which shell you're using? On a Mac, open the Terminal app, and run
- You have Oh My Zsh installed. This is what we'll use for customizing zsh themes.
- You've set up VS Code to allow launching from the command line.
- You've followed Joe's post on How to Create Code Profiles in VSCode.
- TL;DR: Create a new file at
~/code_profiles/teaching/data/User/settings.json. Paste your VS Code settings for screencasts in there.
- TL;DR: Create a new file at
Not sure what settings to use for screencasts?
Here are the settings we use at Apollo for recording screencasts for the Odyssey learning platform.
{"zenMode.hideLineNumbers": false,"workbench.colorTheme": "Apollo Midnight","editor.quickSuggestions": {"other": false,"comments": false,"strings": false},"editor.wordBasedSuggestions": false,"editor.suggestOnTriggerCharacters": false,"workbench.statusBar.visible": false,"editor.renderLineHighlight": "none","javascript.updateImportsOnFileMove.enabled": "always","editor.minimap.enabled": false,"git.enableSmartCommit": false,"window.zoomLevel": 3,"zenMode.centerLayout": false,"zenMode.fullScreen": false,"editor.suggest.snippetsPreventQuickSuggestions": false,"html.suggest.html5": false,"editor.parameterHints.enabled": false,"workbench.tips.enabled": false,"editor.lightbulb.enabled": false,"editor.hover.sticky": false,"npm.fetchOnlinePackageInfo": false,"editor.hover.enabled": false,"editor.formatOnSave": true,"editor.fontSize": 19,"git.enabled": false, // prevents color-coding file names in the Explorer sidebar based on Git status"prettier.printWidth": 80,"editor.glyphMargin": false,"editor.cursorBlinking": "solid","editor.defaultFormatter": "esbenp.prettier-vscode","[javascript]": {"editor.defaultFormatter": "esbenp.prettier-vscode"},"prettier.enable": true,"eslint.format.enable": false,"workbench.fontAliasing": "default","workbench.activityBar.visible": false}
What you will build
Joe's post sets up a teach alias, which you can run from the command line. This command opens a folder in a new VS Code window, with your screencasting settings loaded.
In this post, we'll expand the teach command to understand a few different options. Here's the API we'll build:
teach screencast <folder>- Opens the specified folder in VS Code using your screencasting settings.
- Switches shell preference to your screencasting zsh theme.
teach reset- Sets shell preference back to your personal zsh theme.
- The next time you run
code <file>from the command line, it will load VS code with your original personal settings.
The architecture
To build the teach command, we'll be configuring our ~/.zshrc file. The ~/.zshrc file gets run automatically whenever a new terminal window is open. (The "rc" stands for "run commands".)
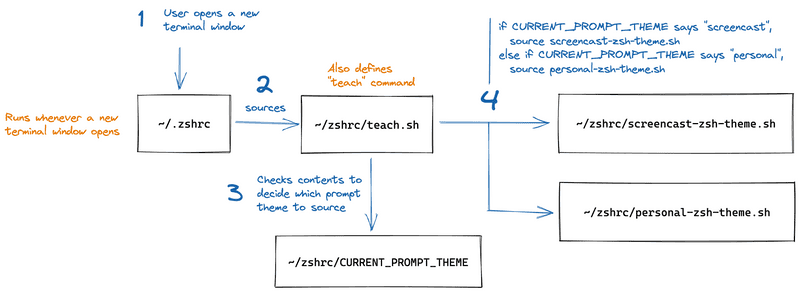
Here's a high-level overview of the architecture we'll build to load the correct shell theme:
- Whenever a new terminal window is opened, the
~/.zshrcfile runs. - We'll set up our
~/.zshrcfile to source another file called~/zshrc/teach.sh. - The
~/zshrc/teach.shscript will check the contents of a text file called~/zshrc/CURRENT_PROMPT_THEME. - Use the contents of
CURRENT_PROMPT_THEMEto load the correct zsh theme.- If the file's contents are the string "screencast", then
~/zshrc/teach.shwill source the zsh theme from the~/zshrc/screencast-zsh-theme.shfile. - Otherwise, if the file's contents are the string "personal", then
~/zshrc/teach.shwill source the zsh theme from~/zshrc/personal-zsh-theme.sh.
- If the file's contents are the string "screencast", then
Instructions
Let's get to it!
Create a new file called
~/zshrc/personal-zsh-theme.sh. You can do this from the command line by running the following:mkdir ~/zshrctouch ~/zshrc/personal-zsh-theme.shMove your existing personal zsh theme settings out of
~/.zshrcand into the~/zshrc/personal-prompt.shfile. Here's what mine looks like:📄 ~/zshrc/personal-zsh-theme.shshell# Path to your oh-my-zsh installation.export ZSH="/Users/megansullivan/.oh-my-zsh"# Set name of the theme to load --- if set to "random", it will# load a random theme each time oh-my-zsh is loaded, in which case,# to know which specific one was loaded, run: echo $RANDOM_THEME# See https://github.com/ohmyzsh/ohmyzsh/wiki/ThemesZSH_THEME="robbyrussell"# Which plugins would you like to load?# Standard plugins can be found in $ZSH/plugins/# Custom plugins may be added to $ZSH_CUSTOM/plugins/# Example format: plugins=(rails git textmate ruby lighthouse)# Add wisely, as too many plugins slow down shell startup.plugins=(git)source $ZSH/oh-my-zsh.shCreate a new file,
~/zshrc/screencast-zsh-theme.sh. You can do this from the command line by running the following command:touch ~/zshrc/screencast-zsh-theme.shPut your zsh theme settings for screencasting in the new
~/zshrc/screencast-zsh-theme.shfile. At Apollo we use the powerlevel10k theme for screencasts, so here's what my teach theme looks like:📄 ~/zshrc/screencast-zsh-theme.shshell# Enable Powerlevel10k instant prompt. Should stay close to the top of ~/.zshrc.# Initialization code that may require console input (password prompts, [y/n]# confirmations, etc.) must go above this block; everything else may go below.if [[ -r "${XDG_CACHE_HOME:-$HOME/.cache}/p10k-instant-prompt-${(%):-%n}.zsh" ]]; thensource "${XDG_CACHE_HOME:-$HOME/.cache}/p10k-instant-prompt-${(%):-%n}.zsh"fi# Path to your oh-my-zsh installation.export ZSH="/Users/megansullivan/.oh-my-zsh"# Set name of the theme to load --- if set to "random", it will# load a random theme each time oh-my-zsh is loaded, in which case,# to know which specific one was loaded, run: echo $RANDOM_THEME# See https://github.com/ohmyzsh/ohmyzsh/wiki/ThemesZSH_THEME="powerlevel10k/powerlevel10k"# Which plugins would you like to load?# Standard plugins can be found in $ZSH/plugins/# Custom plugins may be added to $ZSH_CUSTOM/plugins/# Example format: plugins=(rails git textmate ruby lighthouse)# Add wisely, as too many plugins slow down shell startup.plugins=(git)source $ZSH/oh-my-zsh.sh# To customize prompt, run `p10k configure` or edit ~/.p10k.zsh.[[ ! -f ~/.p10k.zsh ]] || source ~/.p10k.zsh- Note: Using powerlevel10k requires some extra installation steps, which you'll need to do first. For more details, refer to the powerlevel10k installation instructions for Oh My Zsh.
Set the initial value of the
~/zshrc/CURRENT_PROMPT_THEMEfile to "personal" by running the following from the command line:echo "personal" > ~/zshrc/CURRENT_PROMPT_THEMECreate a new file,
~/zshrc/teach.sh. You can do this from the command line by running the following:touch ~/zshrc/teach.shAdd the following to
~/zshrc/teach.sh:📄 ~/zshrc/teach.shshell# read the CURRENT_PROMPT_THEME file, and load the corresponding shell themecat ~/zshrc/CURRENT_PROMPT_THEME | while read line; doif [[ $line = "personal" ]]thensource ~/zshrc/personal-zsh-theme.sh;elif [[ $line = "screencast" ]]thensource ~/zshrc/screencast-zsh-theme.sh;fidone# defines a "teach" command that can be run from the command lineteach() {# usage: teach reset# - sets shell preference back to personal themeif [[ $1 = "reset" ]]thensource ~/zshrc/personal-zsh-theme.sh;echo "personal" > ~/zshrc/CURRENT_PROMPT_THEME;# usage: teach screencast <folder># - switches shell preference to screencast theme# - opens the specified folder in VS Code using screencast settingselif [[ $1 = "screencast" ]]thensource ~/zshrc/screencast-zsh-theme.sh;echo "screencast" > ~/zshrc/CURRENT_PROMPT_THEMEcode --user-data-dir ~/code_profiles/teaching/data $2;# default messageelseecho " Command not recognized. Options:";echo " - teach reset: restore personal preferences for command prompt";echo " - teach screencast <folder>: switch command prompt and open with VS code settings for screencasting";fi}Add the following line somewhere in your
~/.zshrcfile (the exact position doesn't matter):📄 ~/.zshrcshellsource ~/zshrc/teach.shManually reload your
~/.zshrcfile by running the following from the command line:source ~/.zshrc
Now you should be able to use the teach command! Let's test it out in the next section.
Testing it out
Time to see our shell script in action! Let's test out the teach command and make sure it behaves correctly.
Switching to screencasting settings
First, let's check that our screencasting settings load correctly. Run the following from the command line:
teach screencast ~This should open your home directory in a new VS Code window, using your screencast VS Code settings.
Open the VS Code integrated terminal. It should be using your screencasting zsh theme.
Switching to personal settings
Now, let's check that we can reset to our personal settings correctly. Run the following from the command line:
teach resetNow when you open a new shell window (in Terminal or in VS Code), it should be using your personal zsh theme.
Wrap it up
You did it! Now you can use the teach command to switch between shell themes.
I hope this post was helpful. If you enjoyed it, reach out on Twitter or support my work via Ko-fi. I can't wait to see the cool things you create!

